
Audio latency is the small delay between what you play or sing and what you hear in your headphones or monitors.
When latency is too high, recording becomes uncomfortable: you may hear your voice or instrument with echo, a doubled signal, or a timing offset that directly affects performance.
If you have ever asked:
- Why do I hear echo while recording?
- How much latency is acceptable?
- How do I lower latency in my DAW?
Here is the full practical explanation.
1. Simple example: how latency happens
The basic path is:
You speak or play -> interface input -> computer processing -> interface output -> headphones.
Each stage adds a few milliseconds. The sum of all those small delays is what we call total latency or round-trip latency.
2. How latency is measured
Latency is measured in milliseconds (ms):
- 0-5 ms: almost imperceptible
- 5-10 ms: very comfortable for recording
- 10-20 ms: starts to feel obvious
- 20+ ms: distracting and uncomfortable
Ideal latency for recording vocals or instruments
A good target is around 8 ms or lower total latency.
You do not need to hit that exact number every time, but it is a strong professional reference.
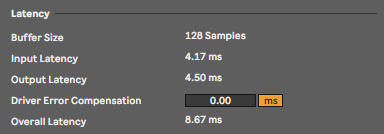
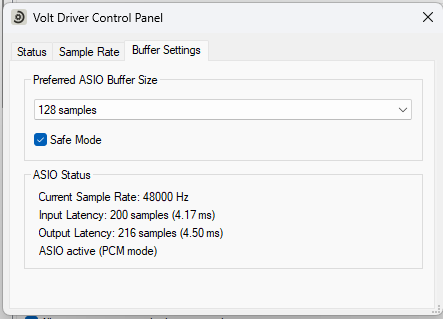
3. Types of latency
Input latency
Time from microphone/instrument input to DAW arrival.
Output latency
Time from DAW playback to what reaches your ears.
Total latency (round-trip)
Input + processing + output.
Most DAWs (Ableton, Reaper, Pro Tools, etc.) display these values in audio settings.
4. Latency vs delay (not the same thing)
- Latency: unwanted technical delay in the system.
- Delay: intentional creative effect used in music production.
If you hear echo while tracking, it is usually excessive latency, not a delay effect.
5. What causes latency
Main factors:
- Buffer size (buffer/block size)
- AD/DA conversion
- DAW and plugin processing load
- Audio drivers (ASIO/CoreAudio)
- CPU performance
- Sample-rate setup
The figure below shows the complete signal path and how latency values are added from microphone capture to performer monitoring.

6. Key factor: buffer size
Buffer size defines how many samples your system processes before sending audio forward.
Typical route: Preferences -> Audio -> Buffer Size.
Typical values
- 32-64 samples: very low latency, ideal for recording
- 128 samples: good balance between stability and low delay
- 256+ samples: delay becomes more noticeable
Practical rule
Start at 64 or 128 samples. If you hear clicks or dropouts, increase slightly until stable.
Ableton example:
Reaper example:
7. Plugins that add extra latency
Even with a low buffer, some plugins add internal latency:
- Lookahead limiters
- Linear-phase EQ
- Oversampling processors
- Mastering-oriented chains
That is why recording through heavy processing chains is usually not recommended. Disable anything non-essential while tracking.
8. Recording latency vs mixing latency
During recording
You need low latency.
During mixing/mastering
You can use larger buffers (256-1024 samples) because real-time performance is no longer required.
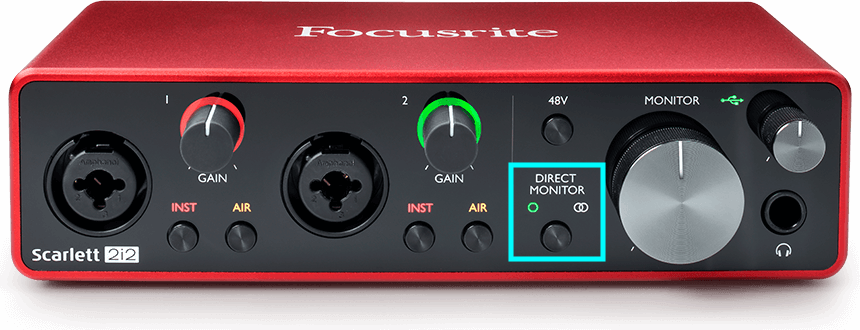
9. How to reduce latency directly on your audio interface
Enable direct monitoring
Direct monitoring lets you hear the input signal before it travels through full DAW processing.
Instead of:
Microphone -> Interface -> DAW -> Interface -> Headphones
Direct monitoring uses:
Microphone -> Interface -> Headphones
By bypassing the full DAW loop for monitoring, perceived latency becomes near zero and recording feels much more natural.
Advantages
- Near elimination of monitoring delay
- Ideal for vocals and instrument tracking
- Independent from DAW buffer size
Disadvantage
- You usually hear a cleaner signal with little or no plugin effects
10. Quick checklist for recording without delay
- Install and select the official interface driver.
- Set buffer around 64-128 samples (or your most stable low value).
- Disable heavy plugins while recording.
- Use direct monitoring when available.
- Keep CPU load under control.
Conclusion
Latency is not a defect in your interface; it is a normal consequence of digital audio processing.
The goal is not the lowest number at any cost. The goal is finding the operating point where:
- The system is stable
- No clicks or dropouts occur
- Your performance flows without distraction
Use this as your baseline workflow whenever you switch between recording and mixing sessions.
Benjamín Gual, productor, ingeniero de mezcla y mastering